在项目中有一个功能需要在浏览器页面中浏览服务器的目录
服务器使用
Nginx,而Nginx提供了相应的ngx_http_autoindex_module模块,该模块提供了我们想要的功能。
Nginx ngx_http_autoindex_module模块中有以下几条命令:
| 命令 | 默认值 | 值域 | 作用域 | EG |
|---|---|---|---|---|
autoindex |
off |
on:开启目录浏览;<br>off:关闭目录浏览; |
http,<br>server,<br>location |
autoindex on;打开目录浏览功能 |
autoindex_format |
html |
html、xml、json、jsonp分别用这些风格展示目录 |
http,<br>server,<br>location |
autoindex_format html; 以网页的风格展示目录内容。<br>该属性在1.7.9及以上适用 |
autoindex_exact_size |
on |
on:展示文件字节数;<br>off:以可读的方式显示文件大小 |
http,<br>server,<br>location |
autoindex_exact_size off; 以可读的方式显示文件大小,单位为KB、MB或者GB,autoindex_format为html时有效 |
autoindex_localtime |
off |
on、off:是否以服务器的文件时间作为显示的时间 |
http,<br>server,<br>location |
autoindex_localtime on; <br> 以服务器的文件时间作为显示的时间,autoindex_format为html时有效 |
浏览目录基本配置
- 根据上面的命令,一个简单的Nginx浏览目录的配置如下:
location /download
{
    root /home/map/www/; #指定目录所在路径
    autoindex on; #开启目录浏览
    autoindex_format html; #以html风格将目录展示在浏览器中
    autoindex_exact_size off; #切换为 off 后,以可读的方式显示文件大小,单位为 KB、MB 或者 GB
    autoindex_localtime on; #以服务器的文件时间作为显示的时间
}
- 页面展示如下:
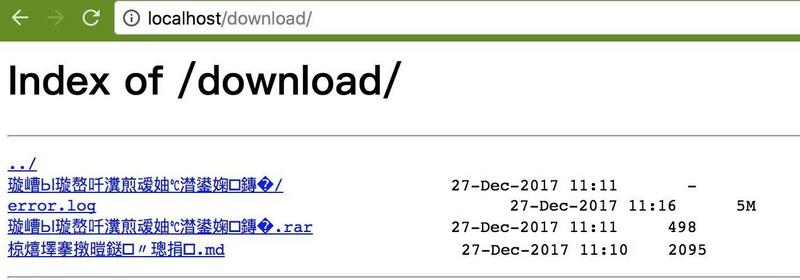 可以看到页面中的展示信息和配置想要的一致,但还有个问题是中文文件名显示的时候乱码。
中文文件名乱码
要解决上面的问题,只需要添加如下配置即可:
charset utf-8,gbk; #展示中文文件名
- 完整配置如下:
location /download
{
    root /home/map/www/; #指定目录所在路径
    autoindex on; #开启目录浏览
    autoindex_format html; #以html风格将目录展示在浏览器中
    autoindex_exact_size off; #切换为 off 后,以可读的方式显示文件大小,单位为 KB、MB 或者 GB
    autoindex_localtime on; #以服务器的文件时间作为显示的时间
    charset utf-8,gbk; #展示中文文件名
}
页面展示如下:
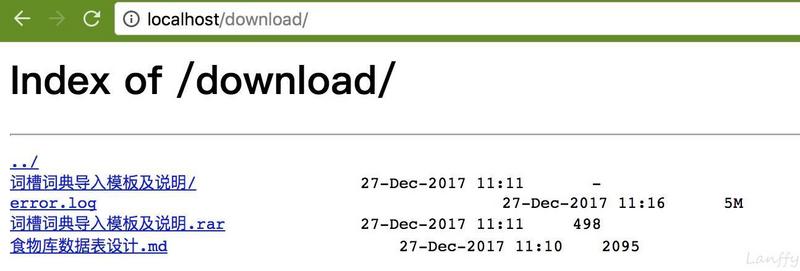
文件列表的第一行是一个目录,点进去,展示如下:
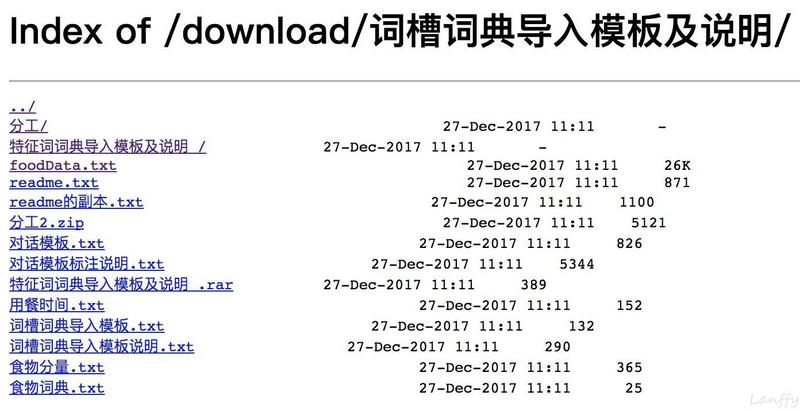
稍微有一点审美的同学是不是觉得这样展示不太美观呢?是的,很不美观,感觉乱糟糟的。下面就来解决这个问题。
目录浏览美化
我们使用开源的Fancy Index来美化页面,Github看这里
在美化之前,需要安装Nginx FancyIndex模块。安装模块步骤如下。
查看Nginx当前编译了哪些模块
-
要查看
Nginx编译了哪些模块,执行以下命令:2>&1 nginx -V | tr ' ' '\n'|grep module,如下:
-
查看完整的编译参数:
nginx -V,如下:
内容如下:
nginx version: nginx/1.13.8
built by clang 9.0.0 (clang-900.0.39.2)
built with OpenSSL 1.1.0f  25 May 2017
TLS SNI support enabled
configure arguments: --prefix=/usr/local/nginx --with-http_ssl_module --with-pcre --sbin-path=/usr/local/nginx/bin/nginx --with-cc-opt='-I/usr/local/opt/pcre/include -I/usr/local/opt/openssl@1.1/include' --with-ld-opt='-L/usr/local/opt/pcre/lib -L/usr/local/opt/openssl@1.1/lib' --conf-path=/usr/local/etc/nginx/nginx.conf --pid-path=/usr/local/var/run/nginx.pid --lock-path=/usr/local/var/run/nginx.lock --http-client-body-temp-path=/usr/local/var/run/nginx/client_body_temp --http-proxy-temp-path=/usr/local/var/run/nginx/proxy_temp --http-fastcgi-temp-path=/usr/local/var/run/nginx/fastcgi_temp --http-uwsgi-temp-path=/usr/local/var/run/nginx/uwsgi_temp --http-scgi-temp-path=/usr/local/var/run/nginx/scgi_temp --http-log-path=/usr/local/var/log/nginx/access.log --error-log-path=/usr/local/var/log/nginx/error.log --with-http_gzip_static_module --with-http_v2_module
动态编译添加Nginx模块
-
在GitHub下载最新源码:ngx-fancyindex
-
源码下载下来后,解压,放到
nginx源码目录(/usr/local/nginx)中,执行下面的代码,编译:
./configure –prefix=/usr/local/nginx –with-http_ssl_module –with-pcre –sbin-path=/usr/local/nginx/bin/nginx –with-cc-opt=’-I/usr/local/opt/pcre/include -I/usr/local/opt/openssl@1.1/include’ –with-ld-opt=’-L/usr/local/opt/pcre/lib -L/usr/local/opt/openssl@1.1/lib’ –conf-path=/usr/local/etc/nginx/nginx.conf –pid-path=/usr/local/var/run/nginx.pid –lock-path=/usr/local/var/run/nginx.lock –http-client-body-temp-path=/usr/local/var/run/nginx/client_body_temp –http-proxy-temp-path=/usr/local/var/run/nginx/proxy_temp –http-fastcgi-temp-path=/usr/local/var/run/nginx/fastcgi_temp –http-uwsgi-temp-path=/usr/local/var/run/nginx/uwsgi_temp –http-scgi-temp-path=/usr/local/var/run/nginx/scgi_temp –http-log-path=/usr/local/var/log/nginx/access.log –error-log-path=/usr/local/var/log/nginx/error.log –with-http_gzip_static_module –with-http_v2_module –add-module=ngx-fancyindex-0.4.2
-
make<font color="red">这里不要make install!!!</font> -
进入
nginx源码目录下的objs目录,执行2>&1 ./nginx -V | tr ' ' '\n'|grep fan -
用
objs目录下的nginx文件替换/usr/bin下面的nginx即可
选择Fancy Index主题
在Github里面找到了两个开源的主题,分别是:
- https://github.com/Naereen/Nginx-Fancyindex-Theme
- https://github.com/TheInsomniac/Nginx-Fancyindex-Theme
大家选一个自己喜欢的就好了,这里我选的是第一个。
但是在实际使用过程中,第一个代码有一些问题,我做了一些修改,想要直接可以使用的,可以用这个:
https://github.com/lanffy/Nginx-Fancyindex-Theme
Fancy Index配置
- 进入Nginx安装的web目录,执行
nginx -V,输出configure arguments: --prefix=/usr/local/nginx,就是这个目录 git clone https://github.com/lanffy/Nginx-Fancyindex-Theme.git- 在
nginx location模块中添加Fancy Index配置,如下:
location /download {
    include /usr/local/nginx/html/Nginx-Fancyindex-Theme/fancyindex.conf; # 目录美化配置
    root /home/map/www/; #指定目录所在路径
    autoindex on; #开启目录浏览
    autoindex_format html; #以html风格将目录展示在浏览器中
    autoindex_exact_size off; #切换为 off 后,以可读的方式显示文件大小,单位为 KB、MB 或者 GB
    autoindex_localtime on; #以服务器的文件时间作为显示的时间
    charset utf-8,gbk; #展示中文文件名
}
- 重启
Nginx即可
到这一步就完成配置了,最终页面展示如下:
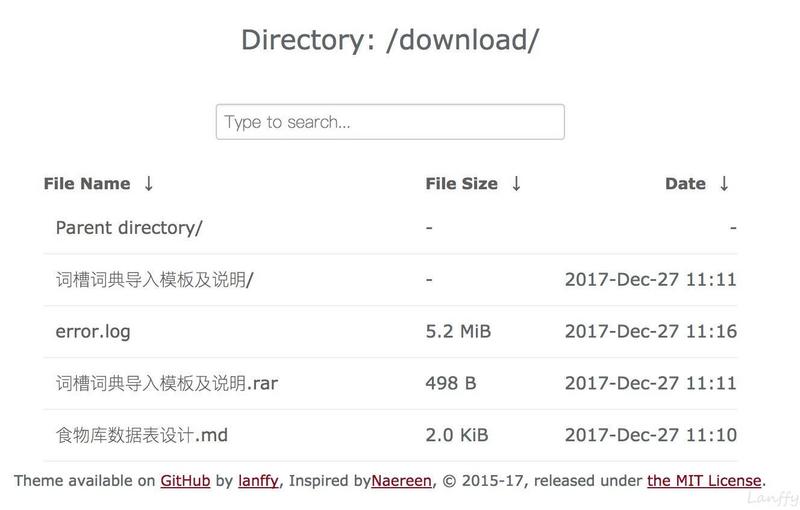
该主题有两种风格,上面一种是light风格,下面的是dark风格:
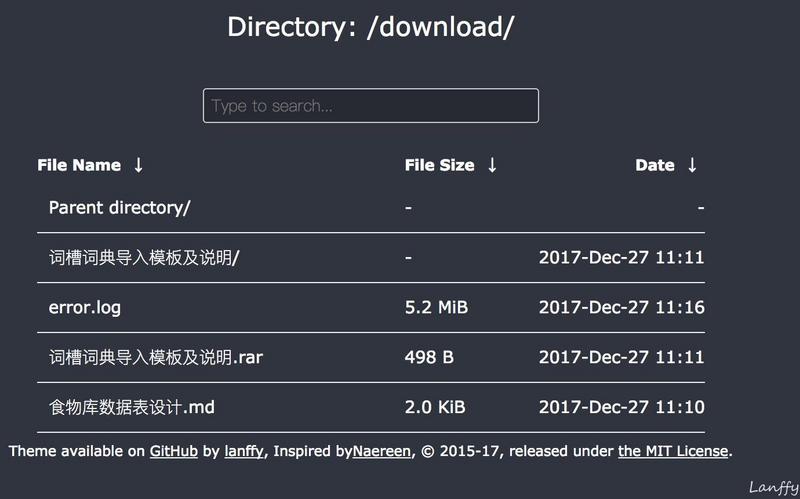
风格在/usr/local/nginx/html/Nginx-Fancyindex-Theme/fancyindex.conf;配置文件中进行修改。


